AfterBurn Manager
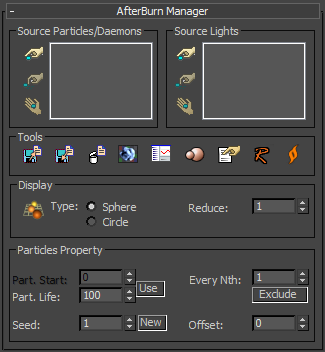
This rollout is one of the main panels for the AfterBurn atmospheric volumetric effects. When using AfterBurn, this rollout is where you'll pick particle systems that will be included in AfterBurn. If you do not have a source particle system selected within this rollout, then no AfterBurn volumetric effects will be generated.
Source Particles
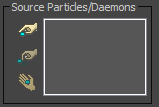
AfterBurn uses the 3ds Max program's built-in particle systems, or compatible third-party particle systems, for position and velocity information. In order to begin working with AfterBurn, you'll need to select which particle systems you want it to create volumetric effects for.
In addition, if you want any AfterBurn Daemons to modify your final volumetric effect, then you need to add these as well in this section. The order in which particle systems and daemons are selected does not affect the final rendered output.
 Pick - Lets you choose any 3ds Max standard particle system and any daemons you might want to include. To select a particle system or a daemon, press the "H" key to bring up the Select by Name dialog box. This allows you to choose a particle system in your scene by the emitter's name. You can add as many particle systems or daemons as you want.
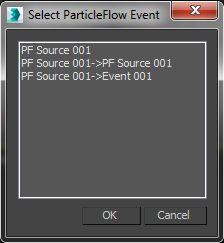
A following dialog will show up when user tries to pick the ParticleFlow system. It enables user to pick the whole system or only a specific event.
When you pick a ThinkingParticles particle system, you will get the following dialog:
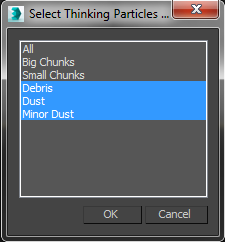
Within it, you can choose any or all of the particle groups that have been created inside of ThinkingParticles 2 that you want to have AfterBurn affect. Once selected, they will show up in the AfterBurn atmospheric as follows:
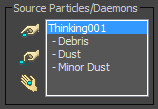
Be aware that if you want to change the groups listed, you must double-click on the master TP particle system listed in the Source Particles/Daemons dialog to re-access the pop-up window.
 Remove - Removes the particle system or the daemon that is currently listed in the drop-down menu located directly on the right. The drop-down menu informs you which particle systems and daemons are included.
 Edit - This button will open the selected particle system or daemon for editing in the Modify panel.
Source Lights
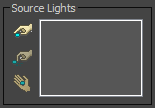
This works the same way as the Source Particles/Daemons, but lets you pick lights instead. You need to pick lights in your scene if you want to illuminate the AfterBurn effect.
Pick - Allows you to choose the light(s) you want to include. Press the "H" key to bring up the Select by Name dialog box, which then lets you choose lights by name. If you want your volumetric effects to cast shadows, you need to select AfterBurn Shadows inside the light's rollout dialog (make sure you have the "Cast Shadows" option checked in the AfterBurn's Illumination/Shading Parameters rollout.)
Remove - Removes the light that is currently listed in the dropdown menu located directly on the right. The dropdown menu informs you which lights are included.
Edit - This button will open the selected light for editing in the Modify panel.
Tools

This group of controls provides quick access to tools and dialogs for common tasks in AfterBurn.
 Open - Clicking this button lets you load AfterBurn setting (.ABN) files. This file type does not include the animation done over time in 3ds max (that is, animation of low and high value spinners over time.) You use the .ABN files to save and retrieve parameter settings at the current frame.
 Save - Save settings (at the current frame) as an .ABN file at the specified time(s) in 3ds max. Again, as above, only low and high numeric values at a particular frame will be saved. All gradients and Animation Flow Curves (AFCs) are also saved in the .ABN file. (AFCs are described in further detail later on in this document.) Most of the time in AfterBurn, you do not need to directly animate high and low value spinners over time; the AFCs work well instead.
 Reset - Clicking this button launches a dialog that asks if you want to reset the AfterBurn parameters. Clicking Yes, resets all AfterBurn parameters, Animation Flow Curves, gradients and spinners back to their defaults. This is a global change and is NOT undoable, so use it with care.
 Preview - Clicking this button opens the Interactive Preview window. This Window can help you to visualize current AfterBurn parameters and to easily understand the influence of certain parameters.
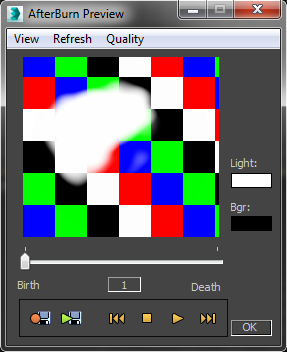
You can also use it to render a single particle over its entire lifespan. If your particle effect is particularly complex, you can render the Preview as an .AVI file, and then view it when the rendering is finished. Or you can scrub the frame slider beneath the preview window to manually see a particular frame within the AfterBurn lifespan.
Note: AfterBurn Daemons, Reflections, Refractions, and Metaballs are not represented in the Preview window.
 AFC View - Open AFC view to be able to edit all AFCs and Gradients found in the AfterBurn UI in one place.
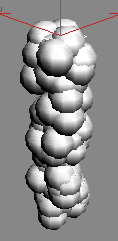
 Show in Viewport - Enabling this button displays a colored AfterBurn wireframe or a shaded shape in the Viewport. The shape is colored with the highest number gradient (if you've selected two colors, the second color gradient will be used to color the shape). HSV variations are shown also. Shape sizing, squashing, and auto stretching with variations are reflected in the Viewport as shown below.
There are two display modes, gizmo and facing. Facing is faster and generally nicer, while gizmo shows the shape, size and orientation of particles more clearly.
Reduce - Use this spinner to futher reduce the number of particles for viewport display. This is cumulative with Every Nth parameter which sets number of particles for render.
|
|
|
|
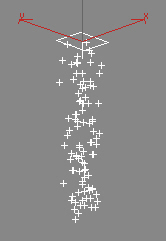
Particles in viewport |
AfterBurn particles in viewport
|
 Scale - Used for scaling the whole AfterBurn effect. You can use this option to "fit" your existing and saved .abn file settings into a new project of a different scale. When you click this button, the following dialog appears:
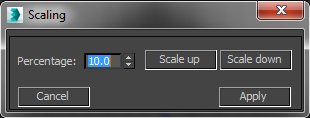
Here you can quickly set a percentage that you'd like to scale your entire AfterBurn volumetric effect.
Procedure
To scale an AfterBurn Effect:
- Set the desired Percentage in the spinner. Normal logic applies: a setting of 10 means 10% of the original size, etc.
- Click on the Scale Up or Scale down button depending on your needs.
- Press Apply.
 Preferences - Lets you set various parameters quickly.
 RapidRay - AfterBurn uses RapidRay for calculating the reflection/refraction of other objects in the scene. For more information about this feature, please go HERE.
 About - The About box gives you information about AfterBurn 4 including the build number and your hardware information.
Particles Property
Usually, AfterBurn gets the particle life information from the existing particle system in order to apply it's volumetric effect. AfterBurn natively supports all of the built in particle systems that come with the 3ds Max application. This means that your normally don't have to use AfterBurn's own Particle Life settings unless you want to achieve some sort of special look - possibly to have the particles ignite after a specific frame, etc.
However, AfterBurn cannot get particle life parameters from certain third-party particle systems and in these cases you will be required to set the particle life manually. (For more information, please consult the developer of those systems if you are having trouble using them with AfterBurn.)
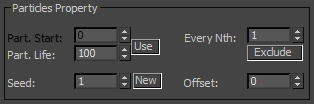
Part. Start - By default, this spinner is disabled, however if you enable the Use button within this group of controls, you can set the start frame where the AfterBurn volumetric effects will begin.
Part. Life - This spinner sets the overall lifespan over the AfterBurn volumetric effect.
If you are having difficulty using a third-party particle system, try enabling the AfterBurn Use button and set the Particle Start and Particle Life parameters manually. If the Use button is not checked, you should nevertheless set the particle life parameters. Otherwise, all Previews will be 100 frames long by default.
Use - Overrides the existing particle lifespan in favor of the Particle Start and Particle Life Spinner values. Activate the checkbox only if you want to limit which particles receive the volumetric effects.
Seed - This spinner represents a random number parameter used to change the look of the AfterBurn Noise pattern. Clicking on the New button will cause the seed value to change.
Every Nth - The "Every Nth" parameter lets you specify which Nth particle should be rendered with an AfterBurn effect. For example, if you have a particle system with 100 particles and you specify that every 10th particle should have an AfterBurn effect, 10 particles will be rendered with an AfterBurn effect (0, 10, 20, 30, 40, 50, 60, 70, 80, 90).
Excl. - The Exclude button computes the Nth particles in the reverse order - instead of rendering an AfterBurn effect on the Nth particle, it's excludes every Nth particle.
Offset - The Offset spinner lets you specify the particle from which the Every Nth setting should be applied from. Following the example above, if you have a particle system with 100 particles, and you specify an Every Nth value of 10 with an Offset of 1, it will render particles 11, 21, 31 and so on with the AfterBurn effect.
Procedure
How to make every 2nd particle colored by a different AfterBurn entry:
Let's assume you have a particle system of 100 particles (indexed from 0 to 99), and that you would like to apply a slightly different AfterBurn effect to every other particle, without adding another particle system into the scene.
- In Rendering->Environment, create one AfterBurn entry, and set Every Nth to 2, and Offset to 0. This will result in rendering particles (0, 2, 4, 8...98.)
- Pick your particle system, and modify the AfterBurn parameters to get the desired effect.
- Add another AfterBurn entry, and set Every Nth to 2, and Offset to 1. This will result in rendering particles (1, 3, 5, 7...99.)
- Pick the same particle system as in Step 2 above, and modify the new AfterBurn parameters to get a different look.